

Senaite Custom Reports - Inserting Analyst Signatures on Analysis Reports
How to add custom signatures to your analysis reports in Senaite LIMS


How would you customize senaite analysis reports to have them include analysts' signatures just above the managers' signatures?
Since the Official Senaite Documentation does not offer an explicit guide to how this can be achieved, I will be sharing the steps I took to get this done. My methods might not be ideal, they might in fact be very very wrong but they worked!
Feel free to reach out in the comments or on Twitter if you have a better way to get this done or improve the code quality. You can also throw in any questions you might have about this article.
Here Goes Nothin...
We will majorly only focus on creating a new method with a few lines of code inside a python file named analysisrequest.py and creating a new template file for our new modified report.
Create a New Getter Method
We want to add our new getter method to the class AnalysisRequest that lives in the analysisrequest.py file located at /home/senaite/buildout-cache/eggs/senaite.core-2.3.0-py2.7.egg/bika/lims/content
Note that we might have similar files in multiple other directories but, what we are targeting, in this case, is
/senaite.core-2.3.0-py2.7.egg/bika/lims/content/.
You can use navigate to the buildout-cache directory on your terminal and use this command to find and list all directories that contain analysisrequest.py:
~/buildout-cache$ find . -type f | grep analysisrequest.py
We first make a copy of this file for backup and save it somewhere safe. Open the file and look for the method named getAnalysts. Just below that method, create a new method, and call it analysts then insert the code snippet below.
@property
def analysts(self):
    """List all analysts who worked on this report.
    """
    analysts = []
    for analyst in self.getAnalysts():
        user = api.get_user(analyst)
        contact = api.get_user_contact(user, ["LabContact"])
        if contact:
            analysts.append({
                "Signature": True,
                "Salutation": contact.getSalutation(),
                "Fullname": contact.getFullname(),
                "JobTitle": contact.getJobTitle(),
                "absolute_url": contact.absolute_url(),
            })
    return analysts
Note: Make sure that the indentation is done correctly. Remember you are inside a class.
Restart Your Server
Because we have modified a file that gets cached by the server, you will need to restart your server to pick up these changes. You can refer to this article on how to do just that.
Create a New Template File
This step is a bit straight up, once again we navigate to the folder containing the templates you wish to modify. Make a copy of the template file for backup and save it somewhere safe. Open the file and look for the comment <!-- SIGNATURES -->. Just above the current signature that starts at, <!-- MANAGERS --> insert the code snippet below:
<!-- ANALYSTS -->
<div class="w-100">
<h1 i18n:translate="" tal:condition="python:len(model.analysts)!=0">Reporting Pathologists</h1>
<table class="table table-sm table-condensed">
<tr>
<tal:analyst repeat="analyst python:model.analysts">
<td style="border:none">
<div>
<img tal:condition="analyst/Signature"
tal:attributes="src string:${analyst/absolute_url}/Signature" style="height:35px"/>
</div>
<div class="font-weight-bold">
<span tal:content="analyst/Salutation"></span>
<span tal:condition="analyst/Salutation"> </span>
<span tal:content="analyst/Fullname"></span>
</div>
<div>
<span tal:content="analyst/JobTitle"></span>
</div>
</td>
</tal:analyst>
</tr>
</table>
</div>
If you look closely, you will notice that the code above looks quite similar to that below it that displays managers' signatures. This is because it is. What we have done is rename the block appropriately </tal:analyst> , get data from the method we created earlier repeat="analyst python:model.analysts" and omit the DefaultDepartment div below JobTitle as we do not need it.
Almost Done! :)
Making Our New Template Available
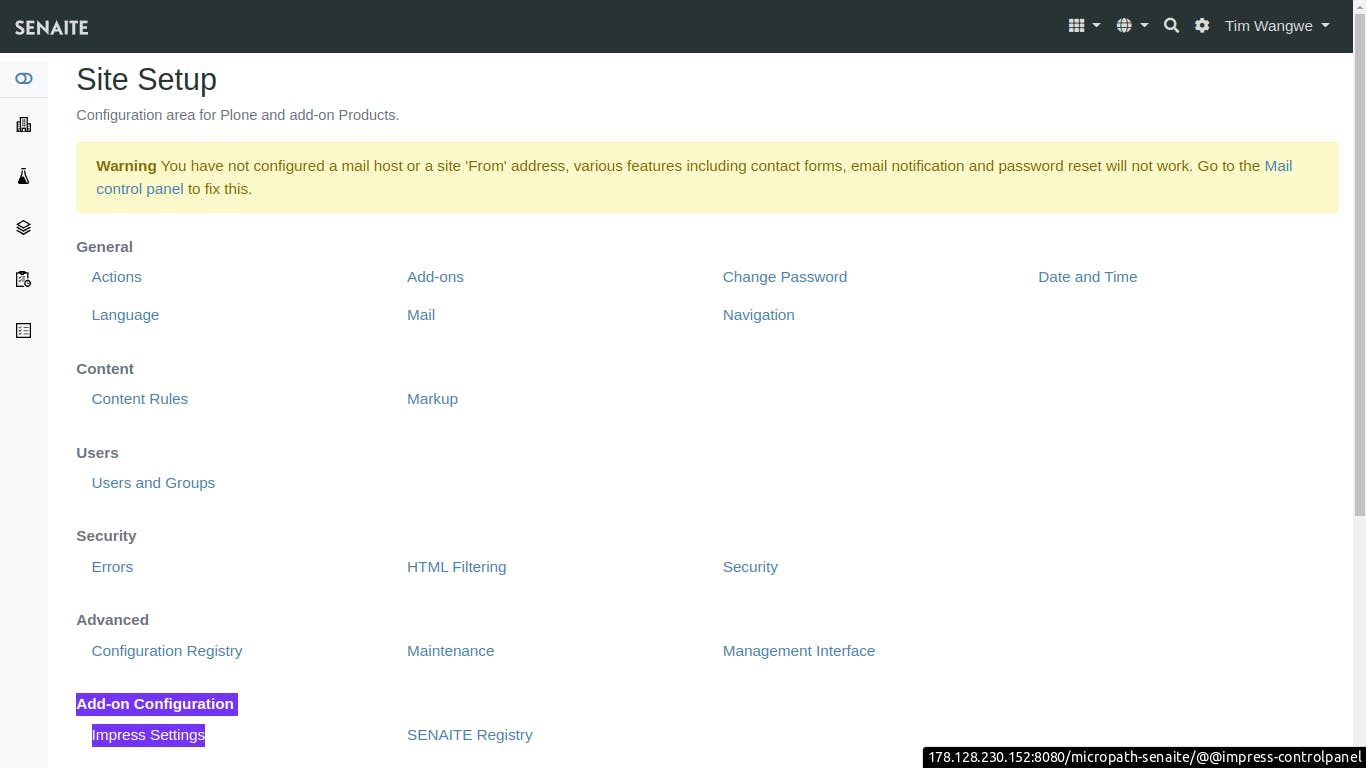
The last bit is making sure our new template is available for publishing. On your Senaite site, navigate to Site Setup, scroll down and click Impress Settings under Add-on Configuration.
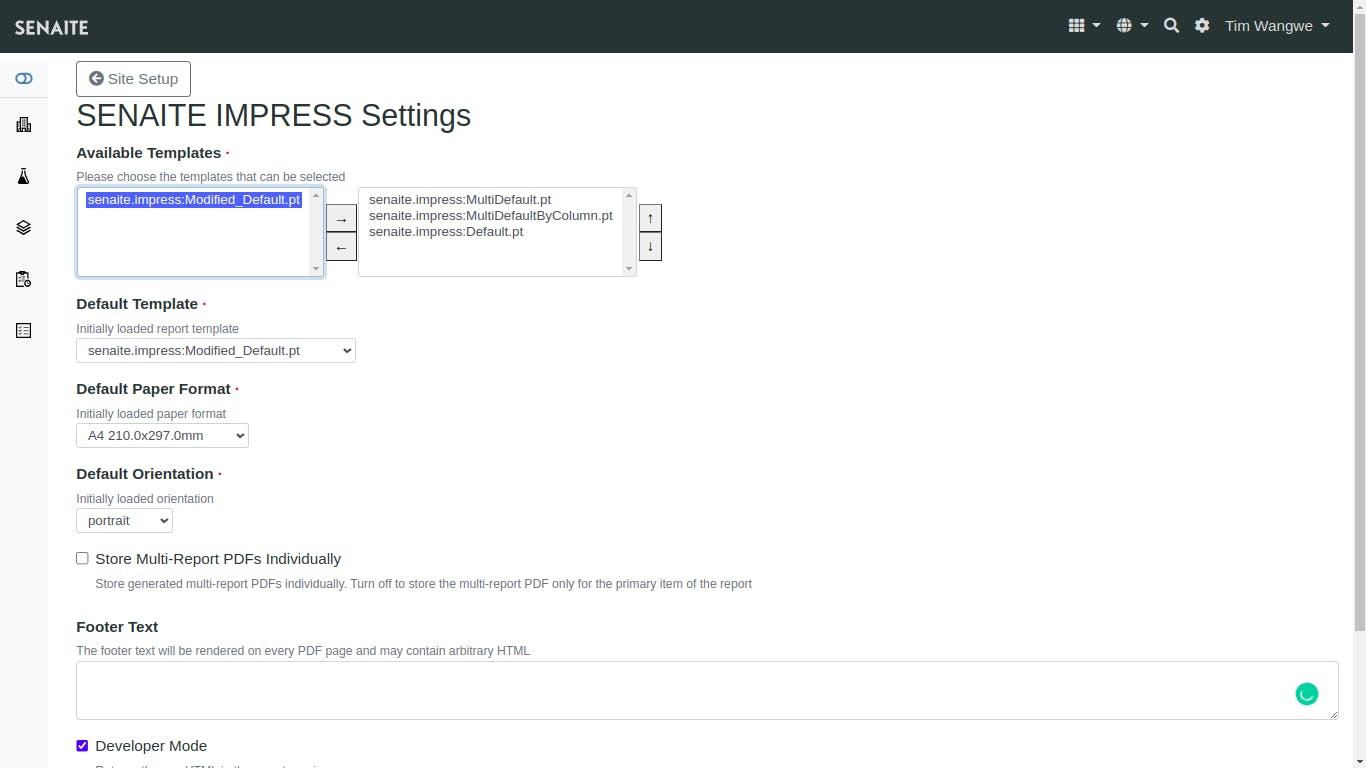
On the Impress Settings page, select your new template and save.
That's it. Done! Just like that, you should now be able to access and use your new custom template to print analysis reports.